I had the privilege of attending a workshop given by Don Etherington the week before last here in Bloomington, Indiana. It was the fruits of a grant attained by my former colleagues at the E. Lingle Craig Auxiliary Library Facility as an opportunity to further professional development within the preservation and conservation labs. Everyone was really excited to learn from Don and get their hands working with some leather!
Day One
As soon as short introductions were made, we got right into the work of learning reback treatments with both linen and with leather.
Everyone selected the books they would practice on. These were books that normally wouldn’t have been given such a luxury revival due to their lack of “value” but for the purposes of the workshop, they were perfect…they were broken.
Don began by talking a bit about the preliminary considerations that need to be made before taking anything apart. He suggested copying the spine of the damaged book on a copy machine. Having a visual reference of the spine helps in a few ways: if false cords are needed they can be aligned with the originals; spine label reattachment or tooling can be duplicated accurately; and a multi-volume set can be consistently reassembled.
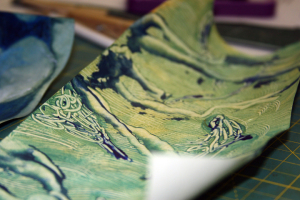
Next, our books were generously coated with Klucel G to not only seal in the red rot, but more importantly to allow the repairs to adhere to the acidic leather. All books were then set aside for the moment we were all waiting for…our introduction to paring.
It is always the case, at least for me, that before gaining a new skill successfully I have to be reintroduced to my hands. When approaching a new technique, such as paring leather, I have to remember, “I’ve never done this before.” It is not reasonable to expect to be good at the first attempt. This of course doesn’t stop me from hoping for a perfect first cut. In my opinion, these expectations were inevitable after Don’s demonstration of the first edging cut. Movements were smooth, the material slid away, and the years of experience that allowed it all to go so fluidly was ignored by all the beginners; pay no attention to the man behind the curtain. We were all reminded that the two types of paring cuts are in fact difficult. It is what makes leather work challenging. If you can’t pare, you are limited with what you can get leather to do. So we put our noses to the grind stones…or should I say litho stones…and practiced every chance we could that day.
Taking a break from the leather for the moment, we moved to the tissue and linen rebacking. First, internal repairs to the book were made so that their thickness would be accommodated for in the spine repairs. If this was done last, we would risk repairs splitting or coming undone due to the unaccounted for material inside.
The material on the covers were lifted and corners were consolidated where it was necessary. We then toned our tissue to match the cover material for the new spine pieces and corner mends. Afterwards, we were shown a few methods of tissue application, some of which I had never seen before. We added hollows to the spines had to wait until day two to attach the pieces to the books. Already, we had a great sense of accomplishment.


Day 2
Continuing with the books started the day before, Don showed us how to attach our linen/tissue spines with two different methods. One with the boards completely detached, and the other with only the outer hinge broken.

After that, our attention was directed back to the leather reback.
Books with existing cords, were ready for leather after the spines were scraped. Those without cords received a hollow and false cords. Using the Xerox from the day before, we were able to place the cords according to the original spine panels.


Today, was the day that we had to begin prep for the real leather spine piece. We had some more practice paring scraps of leather and thinning with the spoke shave. Surprisingly, paring was a little easier than the day before. That’s not to say it didn’t take a few tries at the piece that was thankfully cut too big. After the edges were pared, the head and tail were thinned to turn in thickness with the spoke shave.

This work took us to the end of our work day. We ended a little earlier than before because Don was to give a public talk that evening at the Lilly Library.

The talk was a walk through the last 60 years of Don’s work as a binder and conservator; the topic of his new book Bookbinding & Conservation: a Sixty-Year Odyssey of Art and Craft. It was a great glimpse into the work Don has done in his career so far. He has accomplished an incredible amount and is still not done. He continues to influence the field through the workshops, lectures and willingness to teach.
Day 3
The final day of the workshop began with covering the books with the leather spine piece pared the day before. I felt a growing sense of anticipation for that first piece to go on. Even with Don’s full supervision, it was easy to be nervous. Could something go devastatingly wrong? Probably not, but it feels like it. Pushing the anxiety aside, I wet the leather, applied the paste, and gave it a go. All in all, it turned out pretty well. A few things turned up to be a little challenging, like getting the pared edges to lay flat under the lifted material and molding the leather around the cords, but it came out alright in the end. I was able to understand the technique and how to coax it into place. After finishing the repair, I was hungry to try again.  By the end of the day, I was able to get one more reback in. As Don says, the only way to remember a repair is to do it over and over again.


Even though the workshop was over, I felt like I had really gained some knowledge. For one, I learned what that paring knife I bought a long time ago was for! Really though, I feel like I can realistically try paring and covering with leather in my studio. This is a major change in the view I had of leather before. It was just a scary uncharted territory before, but now I feel like I at least have a map. I feel like I can say the same for the others in the workshop. We had a great workshop!


I had the pleasure of hosting Don, the participants of the workshop, and colleagues (some of which were key in getting the grant) for dinner at my house that evening. It was a culminating point in the weekend that I think is an important part of every workshop. It is the last chance that everyone has a chance to talk with one another (at least with workshops that people travel from different places) but more importantly, it is when everyone relaxes, feels the accomplishment of attaining new skills and bonds the way one can only after having worked together for three solid days toward the same goal. We even had a surprise visit from Jim Croft who happened to be in town that night. Thanks for coming Jim! I know everyone involved with the workshop had a great time and it is with great thanks to everyone who made it possible, especially to Don.